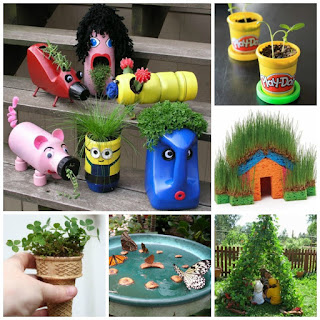
May 24, 2012

The Kids Co-Op- Fun for Summer

Hello, and Welcome to The Kids Co-Op!  Now that Summer is officially upon us, I wanted to feature some fun ideas for the Summer months.  

Familylicious shared a fun kids wash I am sure any kid would love!
What a fun way to beat the Summer heat! 

Raise a Boy made some fruit smoothie popsicles.
Fruit Smoothie Popsicles
Mmm!  What a yummy way to cool off!

Train Up a Child shared this pool noodle obstacle course.
Doesn't this look fantastically fun?

I just love Summer, and am so excited to get outdoors, play in the water, and try some new things!  Happy Summer everyone! 

May 23, 2012

How I potty Trained my Daughter in 3 Days!

Today's post is a little different from what we normally share.  With all of the negativity I found to surround potty training, I feel compelled to share on this topic in hopes of encouraging and empowering you to make potty training a smooth and positive transition.  

Potty training my older daughter, Rosie, was such an intimidating task and one I had been dreading and avoiding.  The horror stories I had heard from others coupled with the arrival of my younger daughter, Jewel, so close to the time Rosie began showing readiness signs made me nervous. So much so that I began putting the process off.

Now, in hindsight, I have no idea what I was so worried about.  Once I began the process of potty training Rosie I only wished I had started sooner.  I can't believe I was so fearful.


I firmly believe that IF a child is truly ready, they can be potty trained in 3 days! The most well known 3 day method is Fellom's Three Day Method.  However, after researching several methods, and then going through the process, this is how we were successful potty training in only three days!

A child's readiness is the fundamental key to their success.  Each child is ready in their own time, with the window of readiness being roughly between 18-36 months of age.  So, how do you know if your child is ready? 

There are several lists of readiness signs like the ones here and here.  However, after going through the process, there are only a few readiness signs I feel are truly necessary before beginning to potty train.

**My List of Essential Potty Training Readiness Signs**

~Language- Your child has to have the language needed to express that they need to use the bathroom.  This really only needs to be one word.  When Rosie was first potty trained, she referred to both pee and poo as pee pee. When she needed to go to the bathroom, she would run over and say pee pee.  That was all the language needed to convey that she needed to go.

~Staying Dry- Having periods of dryness of about two hours.  This illustrates developed bladder control.

~An Interest in the Bathroom Habits of Others- by either wanting to watch you go or simply wanting to tag along while you go

~ Awareness of Bodily Functions-  For some little ones, this means announcing when they are going.  For others, it may mean retreating to a corner or getting a certain expression when making a bowel movement.  All of these illustrate the same thing- an awareness that they are going to the bathroom.  It is no longer just happening.  They know it's happening.

There were several other readiness signs listed as I was researching and preparing to begin the process.  However, in my opinion, the ones listed above are the only ones that absolutely need to be present for success.  Rosie was only 20 months old when she potty trained successfully.  Her bowel cycle was not 100% regular and she couldn't pull her pants up and down on her own, but she was still hugely successful!

More than anything, follow your own child's lead.  Every child is different and may display their readiness to train differently.  As a parent, you will know when the time is right.

Important tip-   Don't feel rushed to start before your child is ready.  If your child is not ready to potty train, it simply will not happen.  Or you may achieve partial success, which only causes the process to be long, drawn-out, and frustrating for both you and the child.  There is no race to win, no reason to rush.  Every child gets there eventually, when the time is just right for them.

So, your child is ready? Now what?

**Preparing for your Potty Training weekend, or as I call it, The Naked Weekend!**

Once I knew Rosie was ready (and I got over my own hesitations and was ready to tackle the task at hand) we had to prepare.  This is how we prepared for our potty training weekend.

~Exposure to the potty- we had actually purchased Rosie a potty well before we anticipated toliet training just to expose her to it.   If your child is displaying readiness signs, and you don't already have a potty, it is time to get one.  Go together, and let your child be involved in the process of picking it out. This builds their excitment, especially if you choose a potty they find appealing or fun.  We got the Fisher-Price Cheer for Me! Potty and Rosie loved it!


She was excited to sit on it, and use it.  There are  lots of other potties to choose from too!

~Big Girl/Boy Underwear-  As another way to both prepare and build excitement, we took Rosie shopping for big girl underwear the week prior to our scheduled naked weekend.  She was (and still is) a Dora the Explorer fanatic so the underwear choice was an easy one.  Once we purchased the undies, we talked to Rosie about how they were for big girls who used the potty.  These Dora Underwear  facilitated training her in so many ways, which I will talk more on later.


  ~Set Up a Reward System-  While some argue that you should not reward a child for using the potty, I strongly disagree.  Having a reward system in place was a huge determining factor in Rosie's success. The same day we went shopping for our big girl underwear, we went shopping for rewards.  I purchased a Dora the Explorer gift bag and filled it with what we called poo prizes.  They were far more appealing then they sound - lol!   We purchased our prizes from The Dollar Tree.  Coloring books, small toys, and single Hershey's Kisses are examples of some of the items in our poo prize bag.  When Rosie went poo, she got to pick a prize.  For pee prizes, we used stickers and fruit snacks.  Every time Rosie went pee, she got 1 sticker and 1 fruit snack from a pack.  This reward system was a fundamental key to her success!

~Clear your Calendar- Now that you and your child are ready, it is time start your naked weekend.  You need to set aside 3 full days where you do not leave the house, except perhaps to play outside in the yard or at a very close by park for a short period. 
 This part is very important, as your child should be kept entirely naked from the waist down for the duration of the 3 days.

~Talk to and Prepare your Child-  On the days leading up to your naked weekend, you should talk to your child about the process they are getting ready to begin.  Build their excitement by telling them how they are getting to be such a big girl/boy.  Read potty training books.  A few of my favorites are A Potty for Me!: A Lift-the-Flap Instruction Manual  and Potty Time with Elmo (Little Sound Book) .  Take your child with you every time you use the potty and talk to them about how they will be just like mommy/daddy soon .

It is important that your child know what is coming and that they will be potty training in the near future.  They need time to mentally digest and prepare.

**Now it is finally time to begin The Naked Weekend!**

The 3 day potty training method or naked weekend as we call it really does work!  We had 100% success with this potty training method!  I have seen parents take different approaches with far less success.  I highly recommend and stand by this method.  I read several articles while preparing for our naked weekend.  A few of them can be found here and here.  So, how does one potty train in 3 days?

** Getting started** 

~Set Your Child up for Success- Choose a small room in the house to spend your time for the majority of the 3 days.  If possible, choose a room with hard wood or tile flooring.  Accidents are going to happen and will happen most frequently on day 1.  Set your child's potty up in the room.  We put ours smack in the middle of the room to make it the focus.  Gather lots of fun activities together and fill the room with them.  Books, crayons, markers, play dough, puzzles, blocks, and television are all great examples.  You want to keep your child busy and happy during this 3 day process, and we all know spending 3 days in the house with a toddler can be quite a daunting task.  We honestly watched a lot of television during this process.  It was a huge help!

What to Expect on Day 1

Day 1 is the hardest!  It takes A LOT of patience and diligence.  You will have to watch your child constantly for signs that they need to go to the potty.  In the beginning, you may not pick up on their need to go until they are already going.  That is ok!  As soon as you see them going place them on the potty where they can and will finish going.  As they go, talk to them about the feeling of needing to go.  Say, " You know how you were just going pee pee.  Well, when you feel that sensation it means it's time to get on the potty. " Be calm and reassuring.  If they go in the potty at all, even just a little, give them a reward.

I was honestly feeling quite discouraged halfway through day 1.  Rosie was having accidents all over the place at the start of the day.  The Swiffer Wet Jet Mop was my best friend.  By the middle of the day, Rosie was starting to yell out pee pee and would run over to the potty on her own.  However, she was still already in the process of going while on her way to the potty.  That was ok though.  She was making progress! She was starting to get it! 

Each time she went on the potty even a little, I gave her a reward.  Each time she went, we talked about the sensation of needing to use the potty and trying to make it to the potty before we start to go.

It is very important to stay calm throughout the process of all these accidents!  If your child begins feeling pressure or any other negative feeling coming from you, they are likely to shut down, and regress back to a diaper.  I have even known instances where a child who was seemingly very ready to potty train regressed to demanding a diaper due to feeling pressured or like his accidents were upsetting his parents.  Accidents will happen.  It is part of the learning process, and there really is no way to learn this very new concept without them.

What to expect Day 2

I was so pleasantly surprised by day 2.  I was expecting it to be a lot like day 1, but it wasn't at all.  Rosie had hardly any accidents on Day 2, and by the end of the day, had the concept down.  She would still begin to go just a little while on her way to the potty but was no longer having out right accidents. Day 2 was all about learning to recognize when she was first feeling the sensation that she needed to go potty so that she could make it in time.

Going poo actually came easier for Rosie.  On Day 1, she tried to hide, but since we were in a small room, I was able to easily pick up on this, and put her on the potty.  I sat her on the potty and gave her some books to look through to act as a distraction and help her relax, and she went.  From that first poo success moving forward, the rest came very easily.  She loved getting to pick a prize from her poo prize bag and would get really excited after each bowel movement.

Day 3- We did it!

By Day 3,  Rosie was accident free for the whole day!  I was amazed!  I couldn't believe it!  I went into this weekend with no real expectations.  I was very nervous and dreading the whole process.  I was honestly very skeptical and didn't actually expect this potty training method to work.  I figured we would try it, and at the very worst, we would lose 3 days.  It worked beyond my wildest dreams!  Rosie was fully potty trained at 20 months old ( because that was the age at which she was personally ready) We still used diapers at nap and bed time, but only big girl underwear for the rest of the day, including when we were out of the house.

Your Naked Weekend was Successful.   Now what? 

I was so nervous to venture out with Rosie in big girl underwear.  I was scared she was going to have an accident and felt compelled to put a pull-up or diaper on her. DON'T!!!

 As nervous as I was, we never used pull-ups!  No matter how nervous you are about taking your newly potty trained child out of the house do not put a pull-up on them!

Why not?  Because a pull-up is a glorified diaper, and if a child has it on, they will use it!  It is confusing for a child to who just spent 3 days potty training to suddenly be given a diaper again.  It is equally confusing for a parent to tell a child to use the potty at home, but a pull up while out.  One of the biggest keys to success is consistency.  That means big girl panties ALL the time, with the exception of nap and night time.  
Note- training at night usually comes a little later.

So, how did our first venture out of the house go?  Surprisingly well!  We went on a play date at a nearby children's center.  We kept the distance traveling short so that Rosie was not in the car for long. I did not give Rosie much to drink directly before leaving the house. We brought our potty with us just in case.  I put Rosie on the potty right before leaving the house, and told her she needed to keep Dora dry, and that she didn't want to get her wet.

As soon as we got to our destination, I took Rosie to the potty to show her where it was and talk to her about using it while out.  I told her that if she needed to go, just tell mommy.  I then asked Rosie about every 10 minutes or so if she needed to go.  If she had said no 3 times in a row, I took her anyway and gave her the opportunity to go.  And that was it!  No pull-ups!  And NO accidents!

Well, no accidents on that day anyway, but there are bound to be a few along the way.  When they happen though, they are really no big deal! As long as you have a change of clothes, you are equipped to handle them.  Those accidents only foster and reinforce all that your toddler has learned.  You see, if they had a pull-up on, they would not even feel that they had an accident.  And if they can't feel it, how can they learn from it?  How can they grow into a confident potty trained child?  They really can't.  Let me say again, pull-ups have no place in the 3 day potty training method!  If you use them, you will only lose all that you worked to achieve during those 3 days!

**Here are some other tips I feel you will find helpful!**

~Keep them naked when at home-  When at home, we kept Rosie either naked or with just her big girl undies on from the waist down.  She preferred to be naked a lot of the time, and it helped her to know there was nothing to catch her accidents if she had them.

~Keep the potty in the room you spend the most time in- we spend the majority of our time on the middle level of our home, so we kept Rosie's potty on that level, outside the bathroom door for easy access.

~Take a Potty with you- we traveled with a potty in our vehicle any time we were leaving the house.  That way, we could put Rosie on the potty upon arriving at our destination and right before getting back into the car.  This was key to minimizing accidents.

~Use those big boy/girl underwear as a training tool-  Rosie's Dora the Explorer underwear really helped us train .  We would tell Rosie not to get Dora wet.  If she got Dora wet, and we were home, we would say oh no, now you have to wait until Dora is dry to wear her again.  We would give her a fresh pair of undies about a half hour later, telling Rosie not to get her wet, or she would have to wait for them to dry again.  Since Rosie was Dora obsessed, she loved wearing her undies and would be upset when she had to wait for them to dry.  This really helped her!

Avoid public toilets with loud automatic flushes- Rosie developed a brief fear of public restrooms due to a scary loud automatic flushing experience.  We were shopping at our local department store, and Rosie needed to go potty.  While she was going the toilet automatically flushed with her sitting on it.  This terrified Rosie. She jumped.  It was so loud! She was terrified of public restrooms for about a month following that incident. We had to go to the car whenever she needed to go, which was quite an inconvenience.  It is best to avoid these loud auto-flushes whenever possible.  For when you can't avoid them,  carry stickers in your purse or bag to cover the auto-flush so this doesn't happen.

Be a constant reminder until this new habit is established- One mistake my husband and I made was that we grew too confident in Rosie's ability too early.  During the first two weeks or so, we were very mindful to ask Rosie if she needed to go potty, and take her regularly.  We started slacking on this a little too early, putting too much of the responsibility on Rosie, and she began to have more accidents.  We easily fixed this by simply beginning to be her reminder again.  Toddlers never want to be bothered with the potty when they are playing and having fun, so they need us to be their reminder for a while :) 

I think that's it!  If you have any questions or personal experiences to share, please feel free to leave a comment below, or email me at growingajeweledrose@gmail.com.  I would love to hear from you.  

~~~~~~~~~~~~ I wish you a happy and smooth potty training experience! :) ~~~~~~~~~~~~~


If you are preparing to potty training, you can find all that you need on Amazon!
     

May 22, 2012

Tuesday Tots- Do it Yourself Toddler Toys


Is it Tuesday already?  I swear these weeks are just flying by!  I hope it was a good one for you and yours!   

This week I am featuring some fun toddler toys that you can make yourself.  All you need are some basic materials and a little imagination.  

The Iowa Farmer's Wife shared some lovely Baby and Toddler Sensory Bottles
I just love how colorful they are.  Both my baby and toddler would surly love them! 

I absolutely LOVE this DIY Sensory Table from Mama of Many Blessings! 
This would surly make a great addition to all of our sensory play activities!

2 Big, 2 Little shared a DIY Light Table
I love that they used rope lighting to make theirs.  We used traditional lighting to make ours, and this lighting is another great option! 

A special thanks to those who have been featured!  Thanks to everyone who shared you fun play ideas and inspirations last week!  We can't wait to see what fun you have been up to this week! 

 Just a few guidelines!
  Please link up your favorite post from the week featuring an activity, story, craft, outing, or even a favorite memory with your tot (under 5)!  Feel free to link more than one post as we are all about the sharing of fun ideas
Please don’t link giveaways.
Once you have linked up,  we ask that you visit a couple of the other posts that have linked up and leave a comment –  we all love reading comments.
I also ask that you grab the Tuesday Tots badge from the side bar, and either add it to your blog or include it in your post through a text link back to Growing a Jeweled Rose (or Rainy Day Mum if you are linking from there)
If you are featured please grab the “Featured at” badge from the side bar.
 Also, just a reminder.  Linking up gives Growing A Jeweled Rose and Rainy Day Mum permission to feature and share your post via several social medias, including Pinterest.  If being featured, we may also grab a photo from your blog.  We will always link back to you when sharing!


May 21, 2012

Guest Post at Inspiration Laboratories

I am excited to be guest posting over at Inspiration Laboratories today!  We are sharing one of our glowing play times!  I would love for you to drop by and check it out.  It would also be great if you took some time to
check out her site, filled with lots of fun play ideas!  

Inspiration Laboratories
I hope you all are having a great day! 

May 20, 2012

Rain Forest Sensory Bath

The response to my themed sensory baths has been overwhelming.  I am so touched by your many comments and emails regarding our fun bath times.  It really is our favorite way to explore, and I just love sharing them with all of you.  For those of you who love these bath times, I am excited to announce that I am creating an ebook full of fun bath ideas.  I hope to have this together some time in the near future.  In the meantime, I have another fun themed bath to share.

We created this Rain Forest Sensory Bath for Rosie not too long ago, and she loved it!  
Rain Forest Sensory Bath
Inspiration for this bath idea came from Rosie's favorite TV show, Dora the Explorer.  I wanted to bring Dora's world to life for Rosie, and tap into her imagination by taking her into Dora's world. 

To create this bath, I first painted a jungle scene on the bathroom wall using washable tempera paint.  I did this earlier in the day during nap so that it would be dry for bath time .  This only took me a few moments, and washed right off after bath,  If you are nervous, perhaps test a small drop of paint on your own wall before drawing an elaborate scene. 

I colored the water green, and scented it with Twilight Woods Bubble Bath. This scent was perfect for the jungle theme.  I then added artificial tropical flowers and pieces of palm.  
I also added a strainer so that Rosie could make rain

Then I collected some of he favorite Dora the Explorer toys.  I hung a map on the wall to act as an extension to the map on the show.  I also really thought the map would further tap into her imagination.  It definitely did! 
Looking for tall mountain
As with all of our fun bath times, Rosie loved this! This bath really helped tap into her imagination.  She created her own little story as she played.


Once the bath play was over, this play scene only led to another fun play activity.  The cleaning up!
Toddlers just love soapy sponge play, as illustrated in our giant sponge sensory play.  Rosie had so much fun helping mommy wash our forest scene from the wall.  As I said before, the tempera paint washed off very easily 

Rosie is at such a magical age.  I want to make the most of this imaginative time in her childhood as it goes so quickly.   What a fun and special way to bring her favorite show to life. 

Does your child have a favorite show?  You could easily alter this bath to fit any shows theme.  The possibilities for themed sensory baths are endless.   You can find all the ones we have shared thus far here, and I have many more ideas just waiting to be brought to life! 

If it is your first time visiting Growing A Jeweled Rose, and you like what you have found, why not follow the fun via our Facebook page?  We are sure to have many fun ideas to share!

( You can also follow us on PinterestTwitter, or subscribe to Growing A Jeweled Rose via RSS)

May 19, 2012

Sensory Pools for Summer

We love our sensory baths so much, we thought it would be fun to take them outside this Summer, and create sensory pools.  I have been anxiously awaiting the warmer weather so that I could begin creating these fun pools for the girls.  Taking the sensory bath idea outside would surly create a whole new experience.  

It was finally warm enough the other day to create our first sensory pool.  Since we just enjoyed our Ocean Themed Sensory Bath the night before, and I wanted to get as much use out of the pasta from that as possible, I created an Ocean themed sensory pool as our very first sensory pool experience.  The girls loved it, and it will surly be one of many sensory pools to come this Summer!
Sensory Pools

To create this pool, I simply tossed the pasta I used from our Ocean bath into the pool.  The pasta is meant to act as seaweed and other plant life found in the ocean.  Then I tossed in a variety of sea creatures, hiding them throughout the pasta.  I did not dye the water for this sensory pool just because the pool is already the color of the ocean, but I did scent the water using the ocean mist bath fragrance I used for the Ocean Bath

The girls had lots of fun!

One thing I really loved about this is that the girls could explore as much as they wanted throughout the day.  I left the pool set up all afternoon.  Both girls returned to explore the pool often, and had great fun!

Jewel loved using the pasta to splash the water! 

Rosie loved digging for the sea creatures, just as she had in the bath.


"Look mommy, I found a star fish!"

She also loved gathering the pasta and throwing it back in.

This was such a fun water activity to have set up.  It made swimming even more fun, and brought new life to one of the girls favorite activities, themed sensory baths

  We will be recreating many of our themed baths as sensory pools this Summer.  I also can't wait to create new sensory pools that we have never explored before. I think Rosie will be really excited each time she sees a new sensory pool set up. I already have so many ideas that I think both girls will love.

  Happy Summer everyone!  :)

If it is your first time visiting Growing A Jeweled Rose, and you like what you have found, why not follow the fun via our Facebook page?  We are sure to have many fun ideas to share!

( You can also follow us on PinterestTwitter, or subscribe to Growing A Jeweled Rose via RSS


Related Posts Plugin for WordPress, Blogger...